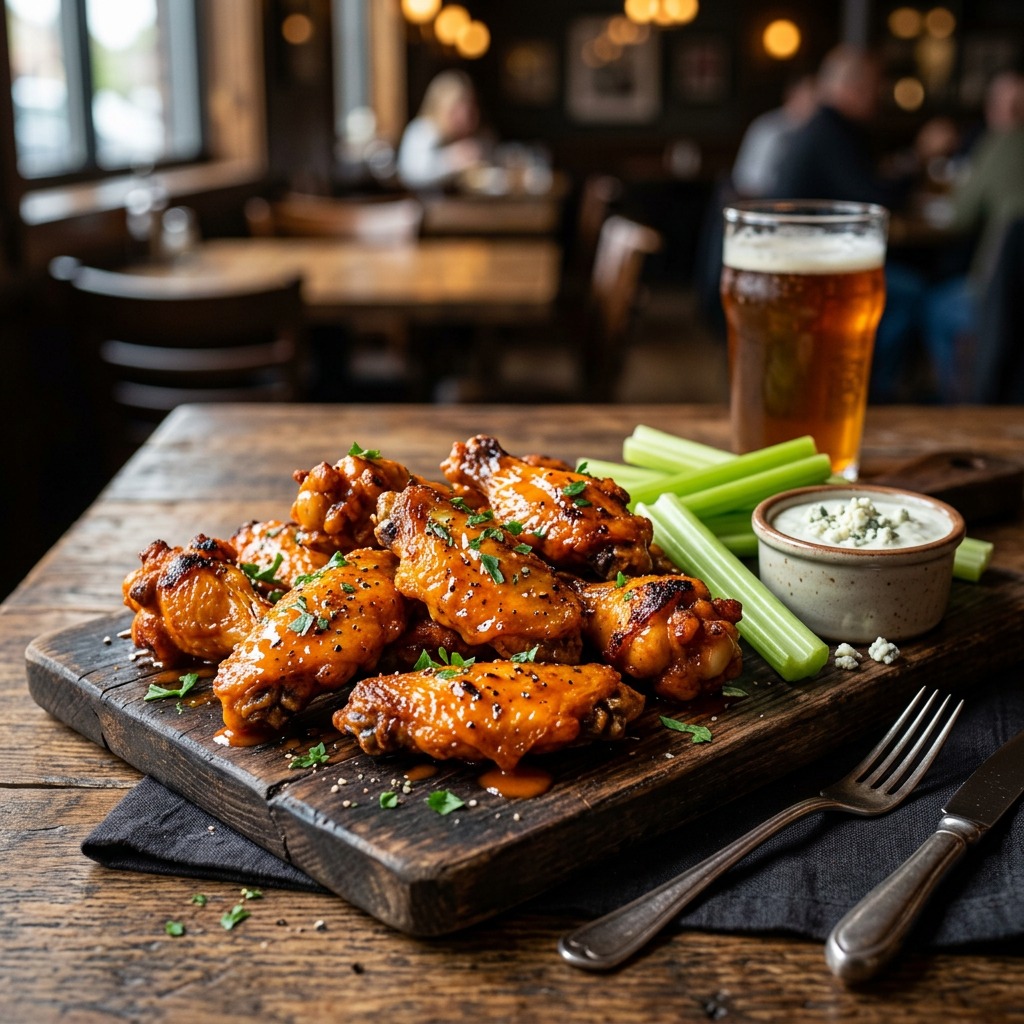
Crispy Baked Chicken Wings: All the Crunch, None of the Fry
Affiliate disclosure: TopFoodNews may earn a commission if you buy through links on this page, at no extra cost to you. We only include products or sources that fit the story.
Baked chicken wings that are actually crispy require one technique adjustment: baking powder mixed into the seasoning before they go in the oven. Not baking soda. Baking powder. It raises the pH of the skin and breaks down proteins in a way that produces a crunch nearly identical to deep frying. Once you know this, you stop settling for soft baked wings.
Ingredients
- 3 lbs chicken wings, split into flats and drumettes
- 1 tbsp aluminum-free baking powder
- 1 tsp garlic powder
- 1 tsp onion powder
- 1 tsp smoked paprika
- 1/2 tsp cayenne pepper
- 1.5 tsp kosher salt
- 1/2 tsp black pepper
Instructions
Step 1 - Dry the wings thoroughly. Pat every wing with paper towels until the surface is completely dry. For best results, place on a wire rack uncovered in the refrigerator for at least one hour, or overnight. The drier the skin going in, the crispier it comes out. This step cannot be shortcut with heat or airflow.
Step 2 - Season. Mix baking powder, garlic powder, onion powder, paprika, cayenne, salt, and pepper in a large bowl. Add the dry wings and toss until every surface is evenly coated. The wings will look pale and dusty. That is correct.
Step 3 - Rack them. Preheat oven to 425F. Set a wire rack inside a rimmed baking sheet. Arrange wings in a single layer with space between each piece. No stacking, no touching. Crowded wings steam each other and lose all crunch.
Step 4 - Bake. Bake at 425F for 25 minutes. Flip every wing with tongs. Increase temperature to 450F and bake another 20-25 minutes until skin is deeply golden, visibly blistered, and audibly crunchy when tapped with tongs.
Step 5 - Sauce or serve dry. If saucing, toss immediately out of the oven while the surface is still dry and hot. The heat helps the sauce adhere without collapsing the crust immediately. Dry rub wings are ready to eat straight off the rack.
Camille's Notes
The overnight dry brine is the difference between good wings and great wings. Season them the night before, leave them uncovered on the rack in the fridge, and the skin becomes almost paper-thin after baking. Aluminum-free baking powder matters. The aluminum variety adds a metallic aftertaste that is subtle but noticeable, especially on wings eaten without sauce. Get the right product and the technique delivers every time.
Tips for the Best Results
Pat the wings completely dry before seasoning - moisture is the enemy of crispiness. Give them at least an hour in the fridge uncovered after seasoning if you have the time. Don't crowd the pan. Space is what lets hot air circulate and do its job. Pull them when the skin pulls back slightly at the drumette end - that's the tell.
Shop the Tools
TopFoodNews may earn a small commission on purchases made through links on this page, at no extra cost to you.
Wing Night Essentials
- Oven-Safe Wire Rack - the single most important tool for crispy baked wings
- Instant-Read Meat Thermometer - never over or undercook wings again
As an Amazon Associate, TopFoodNews earns from qualifying purchases.
{
"@context": "https://schema.org",
"@type": "FAQPage",
"mainEntity": [
{
"@type": "Question",
"name": "How do I know when chicken is fully cooked",
"acceptedAnswer": {
"@type": "Answer",
"text": "Chicken is fully cooked when it reaches an internal temperature of 165u00b0F (74u00b0C). Use a meat thermometer inserted into the thickest part of the meat."
}
},
{
"@type": "Question",
"name": "Can I make this chicken recipe ahead of time",
"acceptedAnswer": {
"@type": "Answer",
"text": "Yes. Cook the chicken fully, let it cool, then store in an airtight container in the refrigerator for up to 3 days. Reheat in a 350u00b0F oven for 10-15 minutes."
}
},
{
"@type": "Question",
"name": "What sides go well with this chicken dish",
"acceptedAnswer": {
"@type": "Answer",
"text": "Roasted vegetables, mashed potatoes, steamed rice, or a simple green salad all pair well with this recipe."
}
}
]
}
{
"@context": "https://schema.org",
"@type": "Recipe",
"name": "Crispy Baked Chicken Wings",
"author": {
"@type": "Person",
"name": "Marcus Webb"
},
"description": "How to make Crispy Baked Chicken Wings at home. Crispy Baked Chicken Wings recipe with step-by-step instructions.",
"image": "https://topfoodnews.com/wp-content/uploads/2026/04/recipe_crispy_wings_v1.jpg",
"prepTime": "PT10M",
"cookTime": "PT75M",
"totalTime": "PT85M",
"recipeYield": "4 servings",
"recipeCategory": "Appetizer",
"keywords": "crispy baked chicken wings, oven baked wings recipe, crispy wings without oil",
"nutrition": {
"@type": "NutritionInformation",
"calories": "420 calories"
},
"recipeIngredient": [
"2 lbs chicken wings separated",
"1 tbsp baking powder",
"1 tsp garlic powder",
"1 tsp smoked paprika",
"1 tsp salt",
"1/2 tsp black pepper"
],
"recipeInstructions": [
{
"@type": "HowToStep",
"name": "Step 1",
"text": "Pat wings completely dry with paper towels."
},
{
"@type": "HowToStep",
"name": "Step 2",
"text": "Toss with baking powder and spices (baking POWDER not soda)."
},
{
"@type": "HowToStep",
"name": "Step 3",
"text": "Place on wire rack over baking sheet."
},
{
"@type": "HowToStep",
"name": "Step 4",
"text": "Bake at 250F for 30 minutes, then increase to 425F for 40-45 minutes until shatteringly crispy."
}
]
}
Ingredients
- 3 lbs chicken wings, split into flats and drumettes
- 1 tbsp aluminum-free baking powder
- 1 tsp garlic powder
- 1 tsp onion powder
- 1 tsp smoked paprika
- 1/2 tsp cayenne pepper
- 1.5 tsp kosher salt
- 1/2 tsp black pepper
Instructions
- Pat the wings very dry and season with salt, pepper, garlic powder, and baking powder if using.
- Arrange wings on a wire rack over a baking sheet so air can circulate.
- Bake at high heat until the skin begins to render and crisp.
- Flip the wings and continue baking until deeply golden and cooked through.
- Rest for 5 minutes so the crust sets.
- Toss with sauce or serve dry with dips while still hot.

in your inbox every week.
Helpful tools for this recipe
TopFoodNews may earn from qualifying purchases. These are practical kitchen staples that fit this kind of recipe, not random filler.
Affiliate disclosure: as an Amazon Associate, TopFoodNews earns from qualifying purchases.
Get weekly recipes + food deals
One quick TopFoodNews email with fresh recipes, grocery finds, fast-food drops, and kitchen shortcuts worth saving.